Shadowsocks to Tor: why it failed as a VPN alternative
I started cleaning up my home infrastructure and tried to make Shadowsocks act like a VPN. It failed in the parts I needed most.
My pile: a few VPSs from different hosts, a Raspberry Pi, a PlayStation, some PCs, and phones. I want simple VPS monitoring, a Raspberry Pi dashboard, and a safe way to deploy services. I also want traffic exit points in other regions and IP ranges. Scheme below:
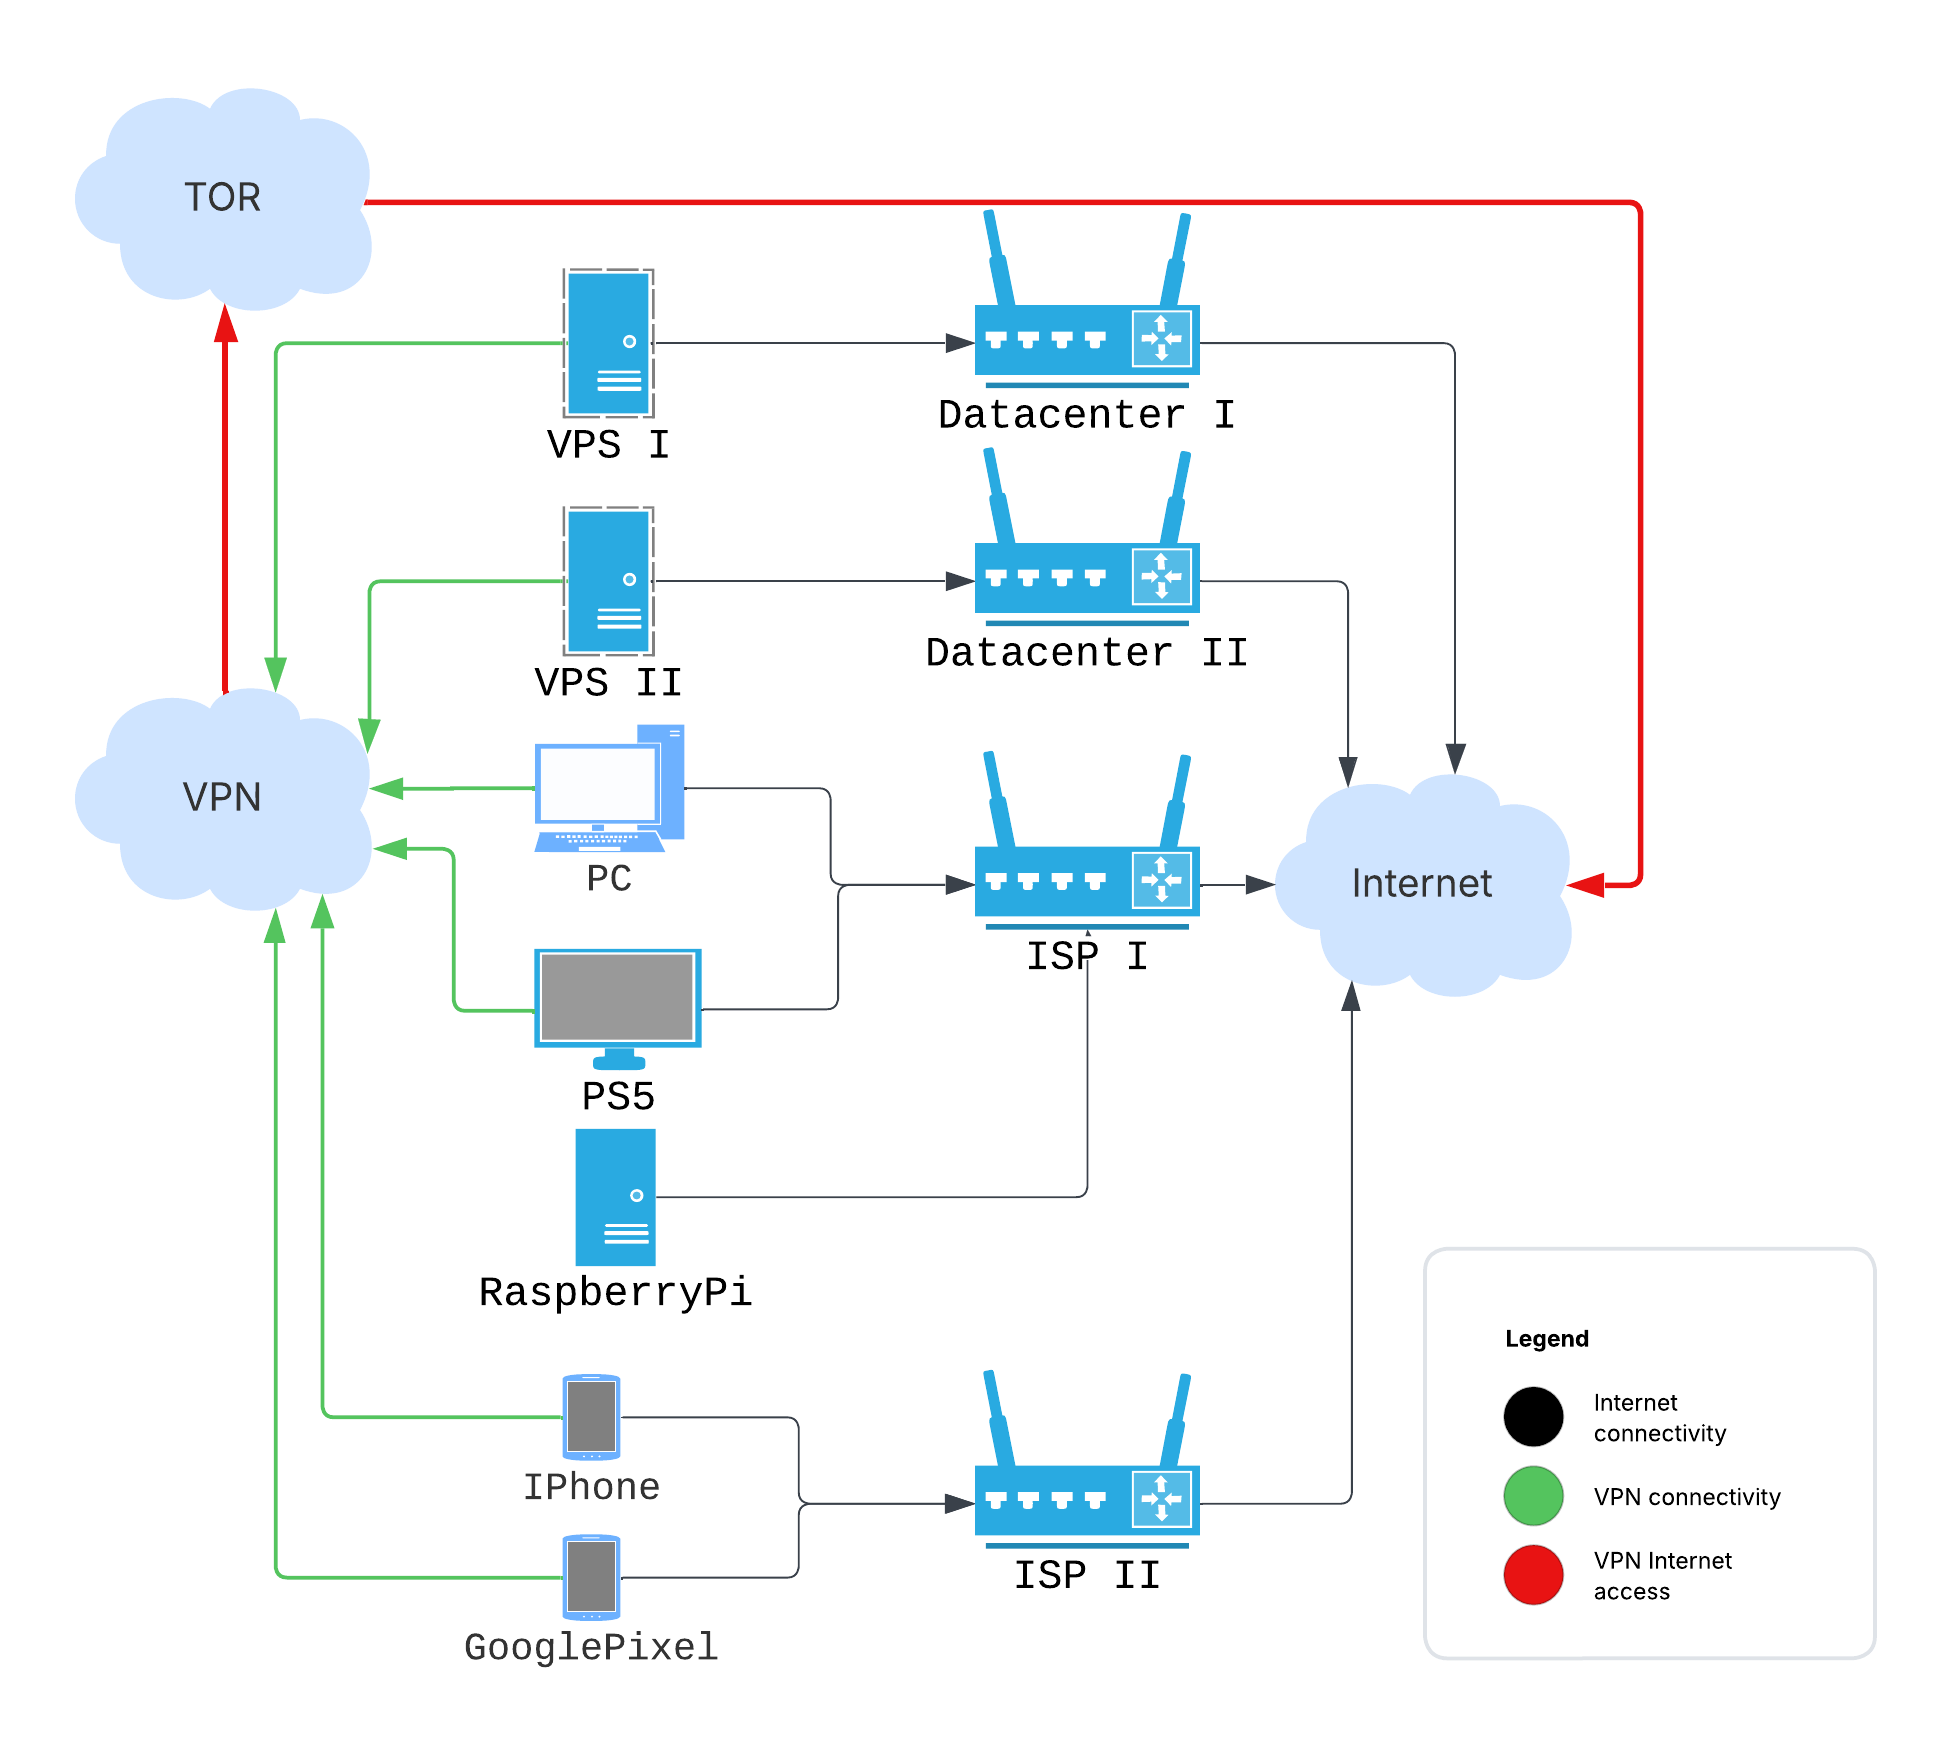
Because the setup crosses several ISPs, I want it reliable and private from each
provider. That’s why I tried Shadowsocks, specifically sslocal in TUN mode,
as a VPN-like routed network. Shadowsocks is built for censorship resistance,
which overlaps with my needs. There isn’t much written about this exact use, so
here is the failure log.
For those in a hurry, here are the prepared Ansible playbooks: https://github.com/irr123/shadowsocks-to-tor
# Tor daemon
I started with the simplest part: setting up Tor. Tor needs no long intro; at least the Tor Browser is familiar enough. In my case, I only needed to set up the daemon (without the browser) and route the VPN’s external traffic through it. (Spoiler: this part works almost perfectly).
# Tor config
According to https://support.torproject.org/apt/tor-deb-repo/, after installing the necessary packages, the daemon starts automatically.
Before installation, I write the config to /etc/tor/torrc:
AutomapHostsOnResolve 1
AutomapHostsSuffixes .onion,.exit
AvoidDiskWrites 1
DNSPort 127.0.0.1:9053
TransPort 127.0.0.1:9040
SocksPort 127.0.0.1:9050
Checking:
torify curl https://check.torproject.org | grep "Congrat"
...
Congratulations. This browser is configured to use Tor.
Simple enough. Tor is mature enough that the default path didn’t fight me.
# Shadowsocks
I use the Rust implementation. It has several components, and the docs make the split harder to learn than it should be:
- ssserver: Actually a service that accepts client connections and forwards traffic externally.
- sslocal: A client, like the one found at https://github.com/shadowsocks/shadowsocks-windows/releases.
- ssmanager: A utility that allows for dynamic management of server instances and provides some observability statistics.
- ssservice: A unified entrypoint to manage all previous commands (?), plus a password generator.
- ssurl: A utility to generate links like ss://ENCODED_CONFIG@SERVER_ADDRESS:SERVER_PORT, which can then be encoded into a QR-code and easily applied on a mobile phone, for example.
# Shadowsocks server config
The docs provide many
installation options,
from regular Linux repos and snaps to Docker images and self-built binaries. I
use pre-built binaries from the GitHub releases page. Same for service
lifecycle: systemd, supervisord, self-managed, Docker/k8s. I use systemd. Here
is the unit file at /etc/systemd/system/shadowsocks-server.service:
[Unit]
Description=Shadowsocks-rust Server Service
Documentation=https://github.com/shadowsocks/shadowsocks-rust
After=network.target network-online.target
Wants=network-online.target

[Service]
Type=simple
User=ssuser
Group=ssuser
ExecStart=/opt/shadowsocks/v1.23.4/ssserver -c /opt/shadowsocks/v1.23.4/config.json
WorkingDirectory=/opt/shadowsocks/v1.23.4
LimitNOFILE=51200
Restart=always
RestartSec=5s

[Install]
WantedBy=multi-user.target
An important part here is the dedicated user. Create it manually, as this user will be referenced in the iptables rules implemented later:
useradd --system --shell /usr/sbin/nologin --no-create-home ssuser
Additionally, I need /opt/shadowsocks/v1.23.4/config.json (exact locations are
my choice):
{
  "server": "0.0.0.0",
  "server_port": 8388,
  "local_port": 1080,
  "password": "YOUR_GENERATED_PASSWORD_HERE",
  "method": "chacha20-ietf-poly1305",
  "mode": "tcp_and_udp"
}
First, generate the password by running (it’s included with the shadowsocks-rust binaries):
ssservice genkey --encrypt-method chacha20-ietf-poly1305
Then, copy the output and paste it as the value for the “password” field above.
Enable and start the service:
systemctl enable shadowsocks-server.service
systemctl start shadowsocks-server.service
After this, I can configure any client, like the Windows one I mentioned previously. It passes traffic through the set-up VPS. Configure a local/global/PAC SOCKS5 proxy and try myip.wtf. With the server set up like this, the next step is to route its outgoing traffic through Tor.
Don’t forget, all these parts are already automated by the Ansible playbook.
# Connecting Shadowsocks with Tor
Now I complete the setup by applying these iptables rules on the VPS running ssserver and Tor:
# Create a new chain for Tor output
iptables -t nat -N TOR_OUTPUT || /bin/true

# Route all output from the 'ssuser' to our new TOR_OUTPUT chain
iptables -t nat -A OUTPUT -m owner --uid-owner ssuser -j TOR_OUTPUT

# Exclude private/reserved networks from Tor redirection (adjust as needed)
iptables -t nat -A TOR_OUTPUT -d 0.0.0.0/8 -j RETURN
iptables -t nat -A TOR_OUTPUT -d 10.0.0.0/8 -j RETURN
iptables -t nat -A TOR_OUTPUT -d 172.16.0.0/12 -j RETURN
iptables -t nat -A TOR_OUTPUT -d 192.168.0.0/16 -j RETURN
iptables -t nat -A TOR_OUTPUT -d 127.0.0.0/8 -j RETURN # Localhost traffic
iptables -t nat -A TOR_OUTPUT -d <VPS public address> -j RETURN # Traffic to VPS itself

# Redirect TCP traffic
iptables -t nat -A TOR_OUTPUT -p tcp -m tcp --syn -j REDIRECT --to-ports 9040

# Redirect DNS UDP
iptables -t nat -A TOR_OUTPUT -p udp --dport 53 -j REDIRECT --to-ports 9053

# Persist the rules
netfilter-persistent save
Now I recheck https://myip.wtf through the Shadowsocks client and should see an IP address from the Tor network.
# Where Shadowsocks failed as a VPN
This can work for narrow cases. https://dnsleaktest.com showed no DNS leaks through the Shadowsocks-Tor setup. WebRTC could still expose my real address. Blocking all UDP might help, but I wasn’t ready to do that.
Another disadvantage: this setup doesn’t reliably resolve .onion addresses for
the end client, while on the VPS it works. On the client, it somehow fails. I
didn’t dig deeply because a bigger issue blocked the setup.
Small, stupid papercut: the Shadowsocks icon for some clients looks too much like the Telegram icon. Gets me every time.
And the most important issues for me:
- Inter-Client Connectivity: The server provides problematic connectivity between clients set up in TUN mode. For example, in the Ansible playbook, I set up Linux clients in TUN mode in their own subnet (192.168.7.0/24). While ICMP (ping) worked between them, neither TCP nor UDP data packets were reliably passed end-to-end from one Shadowsocks client (e.g., my main server trying to reach another VPS also connected via sslocal) to another. TCP connections would appear to establish on the initiating client’s TUN interface, but no actual data would reach the destination client.
- Client Limitations: The standard Windows client (and many others) doesn’t provide a system-wide VPN service; it’s only a SOCKS5/HTTP proxy. This means that I can only access the internet through applications configured to use the proxy. There’s no direct access to other devices in a private network (e.g., 192.168.7.x) if I’m trying to build one, nor does it tunnel all system traffic.
# Verdict: proxy works, VPN doesn’t
Shadowsocks is good at its core job: bypassing DPI and proxying traffic. The standard ssserver tool isn’t built for a routed private network between all clients. It’s a secure proxy. I needed a VPN.
Or at least, I didn’t find a solution using Shadowsocks alone to achieve all my networking goals for this internal infrastructure. Reverting WireGuard 😌